Pages

Monday, May 30, 2011

Happy Memorial Day

While it is kind of ironic to say, 'Happy' and 'Memorial' in the same phrase.. It is somewhat appropriate. We should celebrate all the freedoms that have been afforded us as a Nation, given to us by all those who came before us and gave the ULTIMATE sacrifice in order to defend US, Our Great Nation, and Freedom. Whith out those who who willingly put themselves in harms way, we would not be who we are.

So, while we celebrate this gift, it is important that we remember and honor those who have gone before. As a proud Army wife, I am forever GRATEFUL to those fallen service members, my husband and all those who will follow.

In honor of today, I created this card.. I hope you enjoy. You will recognize the patten as the first quilted card pattern that I tried. I changed up the colors to go for a vintage Americana theme....

GOD Bless America!!!!


Tuesday, May 24, 2011

Panic attack and instructions for May 22 feature

OK, so I have two laptops.. Both pretty old, but they get the job done... Even if they run slower then a turtle.. :o) Anywho, I have been trying to log on to my blog for the past hour to no avail on the one in my craftroom. It refused to let me in and I even changed the password... Still not sure what is going on with that. So, I tried the laptop in my bedroom... BINGO!!!! Worked just fine... Now, I have to figure out what is going on with my other laptop.. Grrrr....

Anyway, on to better things. I was hoping to make this post earlier today to share how I made the card featured on May 22. It is actually VERY simple, but OH so cute.... I am including quite a few pictures, so please be patient. I hope you enjoy and I would love for everyone to start sharing their creations with me.. I LOVE to see others perspectives on different techniques....

So, without further, ado......

I have absolutely fallen in LOVE with this paper pack, Mayberry... The sad thing is, I used up the rest of this particular paper today. So, guess I will be buying another kit shortly since I have more projects in mind..

You can make three cards from ONE 12 x 12 sheet of pattern paper. In the end, you will end up with a 4 1/2 x 4 1/2 card.
To begin, you are going to cut THREE 12x4 strips from your 12x12 pattern paper.
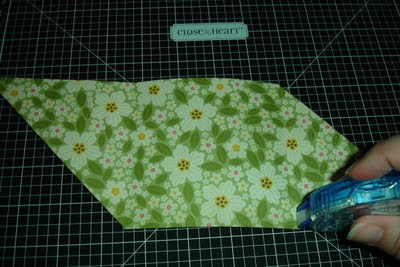
 You are going to score on both the 4" and 8" score lines


Once you have scored your pattern paper, go ahead and fold on the score lines. Depending on which side of your pp you want to show on your card, flip the paper so that the preferred side is upside down on the table. You are then going to fold he two outer squares in on themselves and opposite of eachother, so that you see the side of the paper that is going to be apart of your card. Doing this, you are forming the pocket and door of your card.


Go ahead and use adhesive to secure your folds. You want them to be permanent. Once you have done so, you can flip your paper over so that all you see is the side you are using on your card. Also, depending on which way you would like your card to open, you will add adhesive to only along the bottom of ONE of the triangles. Once you have done so, go ahead and fold that triangle over. That becomes the pocket of your card.


You can then attach your pattern paper to your card base. You will want to choose TWO different colored pieces of cardstock. The base will measure 4 1/2x 4 1/2 and the mat will measure 4 1/4x 4 1/4. Attach your pattern paper to the mat, then cut your ribbon just long enough wrap 1/2" around both sides of the mat. Attach the ribbon to the PP and Mat BEFORE attaching to the card base.


The insert of the card measures 3 1/4x 3 3/4. You want the base to match the mat on the cover of your card and then I always use either white or colonial white card stock on the insert to either stamp a sentiment to write my message. This insert pulls out for the receiver to read, it is NOT attached to the card.


 Decorate the front however you wish. Just make sure that you have a means to secure the cover shut, as it loves to flip open. I used my spellbinders to cut out the ovals that my sentiment is stamped on and a Martha Stewart Butterfly punch that I embellished with CTMH opaque pearls and then attached with CTMH foam tape.

 
I hope my instructions were detailed enough, as this is my first instructional post. I look forward to your comments and input. This really is an easy card to make.
As Always.. Happy Crafting.....


Follow on Bloglovin

Sunday, May 22, 2011

Crafty Craziness....

Ok, so I have been pretty bust lately being crafty and getting ready for Convention in July... I am getting so antsy and can't wait for it to get here.. However, I am glad it is not yet, as I am still trying to get all of my swaps finished.. My goal is a total of 250 cards in a couple of different designs... Today I am sharing a one more that  I am working on. I hope you enjoy and share your inspirations....

This first card I made using a 4x12 sheet from CTMH's Mayberry lvl 2 paper pack. I think this set is becoming one of my favs...


The insert pulls out to write your note. Or you can add a sentiments to suite the occasion.


I welcome all comments or suggestions.
Thanks for stopping by.

Happy Crafting!!
~Rochelle


Follow on Bloglovin

Tuesday, May 10, 2011

My May's Card Swap

Ok, I try to participate in card swap with some friends back in NY. They truly are a great bunch of crafty and creative girls and I miss meeting with them. Our little group will be coming to an end this summer, as the majority of us are military spouses and moving away. I am hoping that we can somehow continue this tradition in the future....

This month's swap theme is juvenile congratulations, god job, or way to go. I was torn, as I do not do very many juvenile cards as my babies are all almost grown now. But, I am hoping this one fits the bill.

As always, I welcome any and all feedback. With the crazy Spring/ Summer weather that has engulfed the country, I truly hope that everyone has been able to find some crafty time for themselves. And for those who have been displaced, my thoughts and prayers go out to you.


Just in case you wanted a close up....

I have to say, thank goodness there were only 9 swappers this month, as I had to cut out each of the owls. I am notorious for projects that require lot's of detailed cutting, and my hands despise me at the end of each project. But, I so love the finished look. If you have tried in the past and did not like the finished product, do NOT loose heart. IT takes plenty of practice and actually, the main trick is moving the paper as you cut instead of your cutting/scissor hand. Start off with images that are not very intricate and graduate yourself as you get comfortable. You will be amazed at what you do.

As always~

Happy Crafting


Follow on Bloglovin

Tuesday, May 3, 2011

50% OFF New CTMH Consultant KIT?!

   Are you a Close to My Heart Addict? Well then, May is the MONTH for you!!!! How would you like to get an automatic 22% discount on your own supplies( with the opportunity to earn even more) and make Money sharing CTMH with your other Scrappy Friends? In May, you can become a CTMH consultant for only $64.50(plus tax and shipping)!!! That is a 50% discount off the normal consultant Kit and you get over $350 in business supplies and CTMH product... You will get EVERYTHING you need to get started including business supplies, wonderful Close to My Heart Product, training from CMTH's wonderful Training Academy and ME!!!


  No to mention, with the Straight To the Top program, you have the opportunity to earn an additional $100 in Free Product Credit!!! How can you go wrong with this promotion? Click HERE for more details on joining my team and learning about all that awaits you as a Close To My Heart independent consultant.


   WAIT, there's MORE!!!!!! May is National Scrapbooking MONTH!!! And to celebrate, Close to My Heart is giving you the exclusive You & Me scrapbooking kit FREE* and your New Consultant Kit at 50% off when you sign up in May! With this wonderful kit, you can make two fully embellished two-page layouts using the included instructions, papers, D-size stamp set, and accessories. The You & Me scrapbooking kit includes: 


   1 – My Acrylix® You & Me Stamp Set
   1 – 12” × 12” Colonial White Cardstock
   6 – 12” × 12” B&T Duos® Papers
   1 – 6” × 9” You & Me Irresistibles™ Chipboard Die-Cut Sheet
   1 Yard – Chocolate Stripe Ribbon
   1 Package – Opaques Mocha Adhesive Gems
   1 – Instruction Guide
Become a Close To My Heart Consultant during May and you'll save 50% off on your New Consultant Kit and get one You & Me kit for free*!
*Shipping/handling may apply. Offer valid May 1–31, 2011 only.

  I can't wait to share with you all that is wonderful with Close to My Heart and being your own boss by doing what you LOVE.... Join My Team Today!!!!

~Rochelle